Popular Posts

This is default featured slide 1 title

Go to Blogger edit html and find these sentences.Now replace these sentences with your own descriptions.This theme is Bloggerized by Lasantha Bandara - Premiumbloggertemplates.com.

This is default featured slide 2 title

Go to Blogger edit html and find these sentences.Now replace these sentences with your own descriptions.This theme is Bloggerized by Lasantha Bandara - Premiumbloggertemplates.com.

This is default featured slide 3 title

Go to Blogger edit html and find these sentences.Now replace these sentences with your own descriptions.This theme is Bloggerized by Lasantha Bandara - Premiumbloggertemplates.com.

This is default featured slide 4 title

Go to Blogger edit html and find these sentences.Now replace these sentences with your own descriptions.This theme is Bloggerized by Lasantha Bandara - Premiumbloggertemplates.com.

This is default featured slide 5 title

Go to Blogger edit html and find these sentences.Now replace these sentences with your own descriptions.This theme is Bloggerized by Lasantha Bandara - Premiumbloggertemplates.com.

Showing posts with label computer. Show all posts

Wednesday, April 23, 2014

How to Fix Windows 7 Hibernation Error 0x000000A0

Blue screen error ေျဖရွင္းနည္း တစ္ခုျဖစ္ပါတယ္.. ဒါကေတာ့ ကၽြန္ေတာ့္ laptop မွာ ျဖစ္ေနတဲ့ Blue screen error ျဖစ္ပါတယ္..။ ဒီအတိုင္း ေနေနရင္းေတာ့ မတက္ပါဘူး Battery ကုန္ခါနီး အားမသြင္းမိလို႔ရွိရင္ စက္မီးေသျပီး အခုလိုမ်ိဳး Blue screen တက္လာပါတယ္..။ ကၽြန္ေတာ့္ရဲ႕ Blue screen ကေတာ့ STOP Error 0x000000A0 ျဖစ္ပါတယ္ ..။ သိျပီးသား လူေတြအတြက္ကေတာ့ မထူးဆန္းေပမဲ့ မသိေသးတဲ့ လူေတြအဖို႔ကေတာ့ ေကာက္႐ိုး တမွ်င္ပါဘဲ ။ ကၽြန္ေတာ့္ အဆင္ေျပသြားတဲ့ ေျဖရွင္းနည္းကေတာ့ 

1, Click Start – All Programs – Accessories.
2, Right click Command Prompt and select Run as administrator.
Run as administrator ကို ႏွိပ္လိုက္ရင္ ေအာက္က ပံုအတိုင္း ေပၚလာပါမယ္..။ 
အဲ့လိုေပၚလာျပီဆိုရင္ C:\Users\HP> ရဲ႕ေဘးမွာ powercfg /hibernate /size 100 လို႔ ကပ္ေရးေပးလိုက္ျပီး Enter ႏွိပ္လိုက္ပါ။ ျပီးရင္ Exit လုပ္ႏိုင္ပါျပီး ဒါဆိုရင္ အဆင္ေျပသြားပါျပီး.. ။

Window 8 Pro အသံုးျပဳခ်င္သူမ်ားအတြက္ Windows 8 Pro VL (Eng/x86/August2013) (3.5Gb)


  Window 8 Pro အသံုးျပဳခ်င္သူမ်ားအတြက္ Windows 8 Pro VL (Eng/x86/August2013) | 3.5 Gb       
       ကိုတင္ေပးလုိက္ပါတယ္။ အားလံုးပဲ အဆင္ေျပပါေစဗ်ာ။ Window 8 Pro 32 bit   
                             version ပါခင္ဗ်ာ။ Resume လည္းရပါတယ္.........
 

Windows 7 Alienware Blue Edition (x64/Eng/Jul2013) (3.9 GB)


ကြန္ပ်ဴတာမွာ Window အလန္းစားေတြကိုမွ အသံုးျပဳခ်င္တဲ့ သူငယ္ခ်င္းမ်ားအတြက္ Windows 7 Alienware Blue Edition (x64/Eng/Jul2013) တင္ေပးလိုက္ပါတယ္။ 64 Bit Edition ျဖစ္ပါတယ္။ 32 Bit Edition ေတြ႕ရင္ ထပ္တင္ေပးသြားပါ့မယ္။ အသစ္အဆန္းေတြကိုမွ အသံုးျပဳတတ္တဲ့ သူငယ္ခ်င္းမ်ားအႀကိဳက္ျဖစ္မွာပါ။ ပါ၀င္တဲ့ Features ေတြကိုေတာ့ ေအာက္မွာၾကည့္ေပးပါ။ Resume လည္းရပါတယ္ခင္ဗ်ာ။ စမ္းသပ္သံုးစြဲလိုသူမ်ား ေဒါင္းလုပ္ရယူႏိုင္ပါၿပီ။

Control panel
Windows Side Show=Remove
Ease Of Access=Remove
Phone and Modem=Remove
Tablet PC Setting=Remove
Control panel view=Category

[Control Panel Add]

Registry=Add
Group Policy=Add
User Directory=Add

Desktop Add/removed:

Show Hidden Wallpapers and Themes=Enable
Application TimeOut=3000
Wait to Kill Application TimeOut=5000
Show Desktop Icons=Enable

Desktop Taskbar:

Show run on start menu=Enable
Use small icons=Enable

Explorer shortcuts:enablesAdministrative Tools=Enable
Device Manager=Enable

Explorer Context:EnableSAdd Device Manager=Enable
Add Group Policy=Enable
Add MS-Config=Enable
Add Services=Enable
God Mode=Enable
Registry Editor=Enable
Change Cursor=Enable
Change Theme=Enable
Change Wallpaper=Enable
God Mode=Enable
Task Manager=Enable
Copy To=Enable
Move To=Enable
Grant Admin Permission=Enable
Open With Notepad=Enable

Explorer Views:Enabled/Disabled

Show Hidden Files and Folders=Enable
hide Drives with No Media=Disable

Security:enabled/Disabled

Anti spyware=Enable
UAC=Default
Windows Firewall=Enable

System Changes or disable/Enables

UXTheme patch=Enable
Command Window Background Colour=Blue
Command Window Text Colour=Green
Set Mouse Pointer Speed Maximum=Enable
Hibernation=Disable
Low disk space warning=Disable

Visual Effects:Enabled/DisableTransparent Glass=Enable
Aero snap=Disable

Internet Explorer:

Default Search Page=www.google.com

19:Addons Added:
list here:

DaRkMaDnEsS_IDM5.18Build4
DTPro5.3.0.0359_Intl(need download STPD 1.83)
7Zip9.30
Auslogics.Registry.Defrag.6.5.1.0
Autoruns.11.50.x64
CCleaner.4.01.4093
ClipName.1.3.0
Defraggler.2.12.628
Gimp.2.8.4.
HashCheck.2.1.11.1
ImgBurn.2.5.7.0
Mozilla.Thunderbird.11.0.1
VLC.Media.Player.2.0.6.0
Waterfox.18.0.1
WinRar.4.20.x64
AutoIt_3.3.6.1
Partition_Wizard_Home_Edition_7.0.0.1
SnakeCracker's_BumpTop_1.11
uTorrent 2.0

News of personalize:

New Theme
New wallpapers
New Icon pack
Cursors:Same
Windows sounds
New log on /log off Wallpapers and rolation orb
New Start Orbs
 

★★ Driver Pack Solution 14 R410 Final - Supports Windows 8/8.1 RTM ★★

မိမိ၀င္းဒိုးမွာ Driver ေတြမျပည့္စံုမႈအတြက္ဘာမွပူစရာမလိုေတာ့ပါဘူး။14 R410 Final ေလးထြက္လာ
ပါျပီ။ 32/64 bit အားလံုးအသံုးလို႔ရသည့္အျပင္ Windows 8/8.1 ထိ Supports လုပ္ေပးပါတယ္။ဒီေကာင္
ေလးကိုအေခြဘန္းျပီးသိမ္းထားလိုက္ရံုျဖင့္၀င္းဒိုးတင္ျပီးတာနဲ႔ဒီေကာင္ေလးကို Run လိုက္ရံုပါပဲ။သူ႔လိုလို
လိုအပ္တဲ့ Driver ေတြကိုအင္စေတာလုပ္ယူသြားပါမယ္။ေနာက္ထပ္ဘာေတြလုပ္ေဆာင္ႏိုင္ျပီးဘယ္လို
Driver ေတြပါ၀င္လည္းဆိုတာေအာက္မွာၾကည့္လိုက္ပါ။4.37 GB ရီပါေသာေၾကာင့္ဖိုင္ခြဲ 15 ဖိုင္ခြဲျပီးတင္
ေပးလိုက္ပါတယ္။


Year / Issue Date : 2014
Version : 14.4 Build 412
Developer : DriverPack Solution

Bit depth : 32bit, 64bit
Language: Multilingual (Russian present )
Tablet: Not required
System requirements : For all versions of Windows
Description: Fully refurbished shell DRP 14.0 automatically selects and installs the necessary drivers for your computer
This version has many new features and optimized for the new operating system Windows 8.1
Compared with the previous version of the DRP 14.0 in this version significantly corrected shell and completely new driver packs
Installing the drivers provided in the shell just a few clicks , and this process can be fully automated
Thanks freshest driver - pakam , this program installs the drivers on virtually any computer of any age
Installation and driver updates this program can be implemented without an Internet connection directly from the HDD / flash / DVD


DriverPack Solution 14 - an updated version of the powerful program that can automatically install the drivers on your computer. This version has many new features and optimized for all platforms (x86-x64), and also supports the new operating system Windows 8.1. The all-new shell DRP 14.0 automatically select and install the correct driver for your computer. This version has many new features and optimized for the new operating system Windows 8.1. Compared with the previous version of the DRP 14.0 in this version is much fixed shell and completely new driver packs. Installing the driver is in a shell just a few clicks, and this process can be fully automated. Thanks freshest driver-pakam, the program will install drivers on virtually any computer of any age.

Advantages DriverPack Solution:
• Automatic driver installation: install all the drivers on virtually any computer for only about 5 minutes
• Save time: no need to spend time searching for drivers, install a few clicks
• Any driver for any computer all drivers on a single DVD-ROM! Simplify downloading new drivers from the Internet
• Ability to update drivers: update the existing driver to more recent versions
• Windows XP / Vista / 7/8 (x86-x64): supports all modern operating systems! As 32-bit and 64-bit versions!
• Ease of use: Simple and intuitive interface
• Ability to self-refinement: The open source

Program is used:
• home computer users
• System Administrators
• Computer Wizard
• Service for computer repair
• other people who are often faced with installing / reinstalling Windows

Pros of using:
• interface is friendly and intuitive
• intelligent technology classification drivers
• Multiple installation options (for the professional to the novice user)
• multilingualism (does not require linguistic knowledge and effort): English, Russian, Ukrainian, German, French, Italian, Spanish, Turkish, Azeri, Dutch, Lithuanian etc...
• Check the availability of new versions of software

Functionality DriverPack Solution 14:
• Efficient and fast search for drivers
• installation of drivers on virtually any computer, just a few minutes
• an "downgrade" from Windows Vista to Windows XP (even if the manufacturer has not posted on its website the driver under Windows XP)
• search and download the missing driver from the Internet, according to set parameters of the driver
• Quickly update an existing set of installed drivers to more recent versions
• Assist in creating and using your own database driver

The program is suitable for all models of computers. That includes drivers for laptops:
Acer, ASUS, HP, Dell, MSI, Samsung, Toshiba, Sony, Lenovo, Fujitsu, Fujitsu Siemens, eMachines, Packard Bell, Clevo, BenQ, Notebook, IBM, Apple, Intel, LG, Compaq, Depo, NEC, Gericom, Matsushita, Medion, K-Systems, Gigabyte, SiS, Gateway.

It will help download free drivers for:
Motherboard, sound card (audio), Video Card, Network Card, Wi-Fi, chipset, controller, Bluetooth (bluetooth), Modem, Web-camera, card reader, CPU, input devices, monitor, printer, scanner, USB, Other ...

This version of the DRP supports Windows 8.1 and 8.1 RTM

Supports Windows 8.1 Spring 2014 Update

Additional Information:
• In the Full-version added the driver packs Video_AMD_Server, Video_nVIDIA_Server, Video_Hybrid, Touchpad_Alps, Touchpad_Elan, Touchpad_Synaptics, Touchpad_Others

Driver Contains In this release

• DP_Biometric_14032.7z
• DP_Bluetooth_14032.7z
• DP_CardReader_14032.7z
• DP_Chipset_14032.7z
• DP_LAN_Intel_14025.7z
• DP_LAN_Others_14032.7z
• DP_LAN_Realtek_14025.7z
• DP_MassStorage_14032.7z
• DP_Misc_14032.7z
• DP_Modem_14032.7z
• DP_Monitor_14032.7z
• DP_Printer_14025.7z
• DP_Sound_ADI_14025.7z
• DP_Sound_CMedia_14025.7z
• DP_Sound_Conexant_14032.7z
• DP_Sound_Creative_14032.7z
• DP_Sound_IDT_14025.7z
• DP_Sound_Others_14025.7z
• DP_Sound_VIA_14025.7z
• DP_Sounds_HDMI_14025.7z
• DP_Sounds_Realtek_14032.7z
• DP_Telephone_14032.7z
• DP_Touchpad_Alps_14032.7z
• DP_Touchpad_Cypress_14025.7z
• DP_Touchpad_Elan_14032.7z
• DP_Touchpad_Others_14032.7z
• DP_Touchpad_Synaptics_14032.7z
• DP_TV_Aver_14025.7z
• DP_TV_Beholder_14025.7z
• DP_TV_DVB_14025.7z
• DP_TV_Others_14025.7z
• DP_Vendor_14032.7z
• DP_Video_AMD_14032.7z
• DP_Video_Intel_14025.7z
• DP_Video_nVIDIA_14025.7z
• DP_Video_Others_14032.7z
• DP_Video_Server_14025.7z
• DP_WebCam_14032.7z
• DP_WLAN_14032.7z
• DP_xUSB_14025.7z


Home Page - http://drp.su

DP_Monitor_14035
DP_Printer_14025
DP_Vendor_14035
DP_Touchpad_Alps_14035
DP_Touchpad_Cypress_14025
DP_Touchpad_Elan_14035
DP_Touchpad_Others_14035
DP_Touchpad_Synaptics_14036
DP_Video_Server_14025.


ဖိုင္ျဖည္နည္းမသိပါက ဒီမွာႏွိပ္ျပီး ၀င္ၾကည့္ပါ။

အေခြဘန္းနည္းမသိပါက ဒီမွာႏွိပ္ျပီး ၀င္ၾကည့္ပါ။


http://mm-knowledgeinfo.blogspot.com/2014/02/inpixio-photo-filters-and-effects.html 
PART 1  |  PART 2  |  PART 3  | PART 4  |  PART 5
PART 6  |  PART 7  |  PART 8  |  PART 9  |  PART 10
PART 11  |  PART 12  |  PART 13  |  PART 14  |  PART 15

Max Uninstaller v2.1.0.1078 DC 08.04.2014 + Key

http://softsvilla.com/wp-content/uploads/2014/01/Max-Uninstaller-Serial-Key-and-Crack-v2.10-Free-Download-incl-Full-Version.png
Uninstaller အသစ္တစ္ခုရထားလို႕ ျပန္ျပီးမွ်ေ၀ေပးလိုက္ပါတယ္ဗ်ာ။ တကယ္တမ္းေတာ့ Uninstaller ဆိုတာ လည္း ေဆာင္ထားသင့္တဲ့ Software တစ္ခုပါဘဲ။ ကၽြန္ေတာ္တို႕ ကြန္ျပဴတာထဲမွာ Uninstall ပါတယ္ဆိုေပ မယ့္ သူ႕ရဲ႕လုပ္ေဆာင္ခ်က္က Software တိုင္းကို Uninstall လုပ္ရာမွာ အကုန္လံုး Remove လုပ္ေပးႏိုင္ပါဘူး။ အခုကၽြန္ေတာ္တင္ေပးလိုက္တဲ့ Max Uninstaller ဆိုရင္ Software တိုင္းကို ကြန္ျပဴတာထဲမွာ အစအနတစ္ခုမွ မက်န္ေအာင္ Remove လုပ္ေပးႏိုင္ပါတယ္ဗ်ာ။ ဘယ္ေနရာမွာ ပိုျပီးအသံုး၀င္လည္းဆိုရင္ Antivirus ေတြ Software ၾကီးၾကီးေတြနဲ႕ Game ေတြကို Uninstall လုပ္ရာမွာ ပိုျပီးသင့္ေတာ္ပါတယ္။ အဆိုပါ Software ေတြကို ေနာက္တၾကိမ္ Install လုပ္ရင္လည္း ဘာ Error မွမရွိႏိုင္ပါဘူး။ Full Version အေနနဲ႕ Serial Key ကိုပါထည့္သြင္းေပးလိုက္ပါ တယ္ဗ်ာ။အေသးစိတ္ေလ့လာခ်င္ရင္ေအာက္မွာဆက္လက္ေလ့လာႏိုင္ ပါတယ္ဗ်ာ။
Max Uninstaller is the industry-leading Windows uninstaller, facilitated by highly engineered uninstall engine to effectively and thoroughly uninstall any program that the standard Windows Add/Remove Programs can’t remove. In addition, Max Uninstaller technicians will resolve any of your submitted program uninstall requests, in case Max Uninstaller couldn’t remove the program completely or fix the corrupt program uninstall/install errors effectively.
Features And Benefits
- 1-click uninstall any unwanted or corrupted programs completely with ease
- Fix program install errors and corrupted install/uninstall error messages
- Clean out all remnants including leftover registry entries and program drivers
- Show detailed information of a certain program installed in your computer
- Provide intuitive and easy-to-use interface to uninstall/fix program errors
- Resovle any difficult program uninstall by 24/7 dedicated technical support!
- Easy to use 1-click scan and powerful uninstall capability

**  Step-1.ေအာက္က Download Button ကိုႏွိပ္လိုက္ပါ  
**  Step-2. "5sec". ေလာက္ေစာင္႕ေပးပါ။

**  Step-3. "  << SKIP AD >>   ".ကိုႏွိပ္ေပးပါ။
**  Step-4. Download Link က်လာပါလိမ္႕မယ္။
**  အဆင္ေျပပါေစဗ်ာ။

Download

Microsoft Security Essentials Definition (Latest Version Update April 11, 2014)

အာလံုး ရင္းႏွီးျပီးသားျဖစ္ၾကမယ္ထင္ပါတယ္... ဒီ MSE (Microsoft Security Essentials) ကေတာ့ Microsoft က ထုတ္လုပ္ထားတဲ့ Virus အတြက္ Antivirus Program  ပါ... ကြန္ပ်ဴတာေတြအတြက္ ေဆာင္ထားသင့္တဲ့ Antivirus ဆိုရင္လည္း မမွားပါဘူး... မေန႔ကမွ ထပ္ထြက္လာတဲ႔ Update ေလးလည္းျဖစ္တာရယ္ Update လည္း လုပ္ေပးသင့္လွတာေၾကာင့္ ထပ္တင္ေပးလိုက္ပါတယ္..။
 
Provides real-time protection for your home PC that guards against viruses, spyware, and other malicious software.
 
Developer: Microsoft

Last updated: April 11, 2014

License: Freeware

OS support: Windows (all)

File size: 92.3 MB
Ref :   http://www.techspot.com
 

Mocrosoft Office 2010/13 & Window 7/8 Activator - KMSpico v9.2.3

https://blogger.googleusercontent.com/img/b/R29vZ2xl/AVvXsEgVPllglHAEZiNnJ2VWuniyZXAP5AgCmj3r0IqV8lU4ysk85tthwFUyLLAO9ssfNqL36SGBaNgWlZwschcp502VWc4EiEb7WcpyY5DYq8BdihtU1cAem-cpMqsKK0pRnigMm6sYrbpaBpiJ/s1600/KMSPico.png
KMSpico v8.9 ရဲ႕ Microsoft Office 2013 နဲ႕ Window 7 , 8 နဲ႕ အျခားေသာ Microsoft OS ေတာ္ေတာ္မ်ား မ်ားကို Activate လုပ္ေပးႏိုင္တဲ႕ Software ေလးအသစ္ထြက္လာလို႕ထပ္ျပီးတင္ေပးလိုက္ပါတယ္ဗ်ာ။ လိုအပ္ ခ်က္တစ္ခုကေတာ့ NET Frame Work 4.0 အနည္းဆံုးရွိထားမွာ အခု Activator ကို Rurn လို႕ရမွာျဖစ္ပါတယ္ အခု အသစ္ထြက္လာတဲ႕ Version မွာေတာ့ Server ေတြျဖစ္တဲ႕ Windows Server 2008/Standard/Datacenter/Enterprise/2008R2/Standard/Datacenter/Enterprise/2012/Standard/Datacenter စတဲ႕ OS ေတြကိုပါ Activate လုပ္ေပးႏိုင္လာပါျပီ။ အေသးစိတ္ကိုေတာ့ေအာက္မွာဆက္လက္ျပီးေလ့လာႏိုင္ပါတယ္ဗ်ာ။

KMSpico – is the ideal tool to activate the final version of Windows 7/8/8.1 and Office 2010/2013. Activator does not require user intervention, the entire activation process takes place in the background, just run the activator and a couple of minutes to check the activation status of Windows and/or Office.
Important: If you like MS Windows and MS Office please buy legal and original this program help to test this products, but recommend you buy legal from creators (M$ Corp). I did this for fun, and now I am done with this. Working in W8 and Office 2013 fresh install and VOLUMEN LICENSE editions. Ja mata ne, Farewell, Hejdе, Ciao, Aloha, Zegnaj, Doei
Based off of open source code KMSEmulator of mikmik38, qad, jm287, zm0d, CODYQX4.
Requirements:
.NET 4.0 or Windows 8/8.1/2012/R2.
Activate:
Windows Vista Business/N/Enterprise/N
Windows 7 Professional/N/Enterprise/N
Windows 8 All
Windows 8.1 All
Office 2010/2013
Windows Server 2008/Standard/Datacenter/Enterprise/2008R2/Standard/Datacenter/Enterprise/
Windows Server 2012/Standard/Datacenter/2012R2/Standard/Datacenter 


**  Step-1.ေအာက္က Download Button ကိုႏွိပ္လိုက္ပါ  
**  Step-2. "5sec". ေလာက္ေစာင္႕ေပးပါ။

**  Step-3. "  << SKIP AD >>   ".ကိုႏွိပ္ေပးပါ။
**  Step-4. Download Link က်လာပါလိမ္႕မယ္။
**  အဆင္ေျပပါေစဗ်ာ။

Download

★★ Windows 7 XE 4.2.2 (x86 + x64)[EN-RU] [2014] ★★

01.04.2014 ေန႔ကထြက္လာတဲ့ Integrated updates အသစ္ေလးပါ။(32/64bit)2ခုလံုးပါပါတယ္။
USB, Chipset driver အျပည့္အစံုပါျပီးသားေလးပါ။အသင့္ပါလာတဲ့ေဆာ့စ္၀ဲေတြကလည္း (50)ေက်ာ္ပါ
တယ္။ Language ကေတာ့  English / Russian ပါတဲ့အတြက္ၾကိဳက္ရာကိုေရြးႏိုင္ပါတယ္။ေဒါင္းေလာ့စ္ဖိုင္
ထဲမွာ 32/64 bit တြဲျပီးထည့္ေပးထားပါတယ္။မိမိၾကိဳက္ရာကိုအေခြဘန္းျပီးအသံုးျပဳႏိုင္ပါတယ္။USB ကေန
၀င္းဒိုးတင္ခ်င္သူေတြအတြက္ USB Tool ကိုပါထည့္သြင္းေပးထားပါတယ္။


Version of Windows: 6.1 (build 7601: Service Pack 1)
Available for installation Editorial: Enterprise x86, Enterprise x64
Language: English / Russian
Treatment: not required (the installer is already disinfected)

Description:
Feature of this assembly is obviously personalized distribution with minimal deployment time, optimized for speed and versatility. Thus, it suffices to insert the flash-drive and boot from it (it is also possible to install from a 2x DVD drives). The installation process prompts you to select a partition on that machine. After 15-20 minutes, your system will almost completely ready. It will in itself comprise one quality audio player, video codecs to play all video formats, antivirus with updated antivirus database for protection immediately after installation, an office suite, all operating system updates, sets of additional libraries (. NET, C + +, Java, Flash , Silverlight ...), modern Web-browser with a cutoff of advertising and spelling, quick viewer of pictures, defragmenter and extended and safe tool for cleaning the entire system from the accumulated debris. In instolyator and in the same integrated set of drivers for USB, Chipset and Masstorage, making it possible to install a USB 3.0 flash drives and memory cards for various RAID / AHCI controllers.
Assembly based on the original English Windows 7 Enterprise. Default interface language Russian. From the assembly does not cut through aggressive, all changes made to the components had an opportunity to remove / disable the official means by Microsoft.

System requirements:
For x86 systems:
CPU: 32-bit or 64-bit processor with a clock speed of 1 gigahertz (GHz) or higher;
RAM: 1 gigabyte (GB) of random access memory (RAM);
HDD: 20 gigabytes (GB) of hard disk space;
Video: DirectX 9 graphics device with WDDM driver version 1.0 or higher.

For x64 systems:
CPU: 64-bit processor with a clock speed of 1 gigahertz (GHz) or higher;
RAM: 2 GB of memory (RAM);
HDD: 22 GB of hard disk space;
Video: DirectX 9 graphics device with WDDM driver version 1.0 or higher.

What added:
Integrated Service Pack 1
Integrated updates until 01.04.2014
Integrated driver for USB, Chipset and Masstorage (allows you to install with USB 3.0 and RAID / AHCI controllers)
7-zip 9.30 (x86/x64)
Notepad2 4.2.25 (x86/x64)
Sun Java 7 update 51 (x86/x64)
AIMP v3.5.5 build 1345 c400's Repack
K-Lite Codec Pack 10.4.0
Microsoft Silverlight v5.1.30214.0 (x86/x64)
Microsoft. NET FrameWork 4.5.1 + updates
Adobe Flash Player 12.0.0.70
Adobe Shockwave Player 12.0
STDU Viewer 1.6.300
Defraggler 2.17 (x86/x64)
CCleaner 4.12 + CCEnhancer (x86/x64)
CPU-Z 1.69 (x86/x64)
HWMonitor 1.24 (x86/x64)
Nero Burning ROM & Nero Express 15.0.20000
Microsoft DirecX 9 (latest build) (a complement to the already installed DirectX 11)
Libre Office 4.2.2
Mozilla Firefox 28 + AdBlock (all advertising is banned) + Spellchecker (En / Ru)
Symantec Endpoint Protection 12.1.4013.4013 (RU4) Rus (with all updates) (x86/x64)
TrueCrypt 7.1a (x86/x64)
GreenShot 1.1.7 build 2643
HashCheck 2.1.11 (x86/x64)
XnView 2.20

An additional set of system libraries:
Microsoft Visual C + + Redistributable 2005 (x86/x64)
Microsoft Visual C + + Redistributable 2008 (x86/x64)
Microsoft Visual C + + Redistributable 2010 (x86/x64)
Microsoft Visual C + + Redistributable 2012 (x86/x64)
atl70.dll 7.0.9975.0 x86
atl71.dll 7.10.6101.0 x86
comct232.ocx 6.0.98.16 x86
comct332.ocx 6.7.0.9816 x86
comctl32.ocx 6.0.98.16 x86
comdlg32.ocx 6.1.98.16 x86
dblist32.ocx 6.1.98.16 x86
libeay32.dll 1.0.1.5 x86/x64
libssl32.dll 1.0.1.5 x86/x64
mci32.ocx 6.1.98.16 x86
mfc70.dll 7.0.9975.0 x86
mfc70chs.dll 7.0.9975.0 x86
mfc70cht.dll 7.0.9975.0 x86
mfc70deu.dll 7.0.9975.0 x86
mfc70enu.dll 7.0.9975.0 x86
mfc70esp.dll 7.0.9975.0 x86
mfc70fra.dll 7.0.9975.0 x86
mfc70ita.dll 7.0.9975.0 x86
mfc70jpn.dll 7.0.9975.0 x86
mfc70kor.dll 7.0.9975.0 x86
mfc70u.dll 7.0.9975.0 x86
MFC71.dll 7.10.6101.0 x86
MFC71CHS.DLL 7.10.6101.0 x86
MFC71CHT.DLL 7.10.6101.0 x86
MFC71DEU.DLL 7.10.6101.0 x86
MFC71ENU.DLL 7.10.6101.0 x86
MFC71ESP.DLL 7.10.6101.0 x86
MFC71FRA.DLL 7.10.6101.0 x86
MFC71ITA.DLL 7.10.6101.0 x86
MFC71JPN.DLL 7.10.6101.0 x86
MFC71KOR.DLL 7.10.6101.0 x86
MFC71u.dll 7.10.6101.0 x86
mscomct2.ocx 6.1.98.16 x86
mscomctl.ocx 6.1.98.33 x86
MSCOMCTL32.OCX 6.0.88.62 x86
mscomm32.ocx 6.1.98.16 x86
msdatgrd.ocx 6.1.98.16 x86
msdatlst.ocx 6.1.98.16 x86
mshflxgd.ocx 6.1.98.16 x86
msflxgrd.ocx 6.1.98.16 x86
msinet.ocx 6.1.98.16 x86
msmask32.ocx 6.1.98.16 x86
msstdfmt.dll 6.1.98.16 x86
MSSTKPRP.DLL 6.1.98.16 x86
msvbvm50.dll 5.2.82.44 x86
msvci70.dll 7.0.9466.0 x86
MSVCP70.DLL 7.0.9466.0 x86
msvcp71.dll 7.10.6052.0 x86
msvcr70.dll 7.0.9981.0 x86
msvcr71.dll 7.10.7031.4 x86
msvcrt10.dll x86
mswinsck.ocx 6.1.98.17 x86
OpenAL32.dll 6.14.357.25 x86/x64
picclp32.ocx 6.1.98.16 x86
richtx32.ocx 6.1.98.16 x86
ssleay32.dll 1.0.1.5 x86/x64
sysinfo.ocx 6.1.98.16 x86
tabctl32.ocx 6.1.98.16 x86
Vb40016.dll 4.0.24.22 x86
Vb40032.dll 4.0.29.24 x86
vbrun100.dll x86
vbrun200.dll 2.0.9.8 x86
Vbrun300.dll 3.0.5.38 x86
wrap_oal.dll 2.2.0.7 x86/x64

What is off:
Windows Media Player
Microsoft Internet Explorer

What cut:
Australia Local Pack
Canada Local Pack
DVD Maker
Great Britain Local Pack
Inbox Games
Internet Games
Music and Video Examples (Ringtones)
New Zealand Local Pack
OEM Help Customization
Photo Experience
Premium Inbox Games
Speech and Natural Language
Extra Themes
System Restore
Windows Backup
Windows Media Player Troubleshooters
Windows Recovery Disc
Windows Restore Utility

Boot menu:
Run Windows 7 Live - Runs Windows 7 LiveCD version. Convenient to work with the data on the computers where the OS died and you need to copy the data before formatting.
Antivirus scan - Avira Antivirus 1.9.152.0
Testing memory - memtest86 + 5.01
Recover passwords Windows - Active @ Password Changer 3.0 (resets passwords of user accounts Windows)
Recovering HDD - HDD Regenerator 2011
Backup - Acronis True Image Home 2014 Premium 17.0.6673
Working with sections HDD - Acronis Disk Director Home Update 2 11.0.2343
Work with the loader - Start / Boot Loader PLoP 5.0.14

What to do in version 4.2.2:
Bootable Utilities: Updated version of Acronis True Image Home 2014 Premium 17.0.6673
Bootable Utilities: Updated database and core antivirus Avira
Update now SEP
Integrate new updates for Windows
Update K-Lite Codec Pack 10.4.0
Clean the system from old updates
Update AIMP v3.5.5 build 1345 c400's Repack
Update CPU-Z 1.69
Update CCleaner 4.12
Update CCEnchancer 3.9
Update Mozilla Firefox 28
Update Libre Office 4.2.2
Update XnView 2.20
Update Microsoft Silverlight v5.1.30214.0 (x86/x64)
Update Adobe Flash Player 12.0.0.70

What to do in version 4.2.3:
Update GreenShot 1.1.8.35

Checksums:
File: Windows_7.XE_4.2.2_DVD-1.iso
CRC-32: e1075a28
MD4: b5b7e65b2deb68b4c8857492bff4551f
MD5: 3b060e3846b20c0624719ba87ed23bad
SHA-1: 8cff346e825dadd797cf35a0303ffd967a4a6dec

File: Windows_7.XE_4.2.2_DVD-2.iso
CRC-32: 3f56ec0b
MD4: a031f5047d8f3f4419c8fb02893cc310
MD5: 15f0c66b09c66c23e07959f9d6a194cb
SHA-1: 9ca279256bbb70b1efa7845bc37901273558c96d


ဖိုင္ျဖည္နည္းမသိပါက ဒီမွာႏွိပ္ျပီး ၀င္ၾကည့္ပါ။

အေခြဘန္းနည္းမသိပါက ဒီမွာႏွိပ္ျပီး ၀င္ၾကည့္ပါ။


PART 1  |  PART 2  |  PART 3  |  PART 4  |  PART 5
PART 6  |  PART 7  |  PART 8  |  PART 9  |  PART 10
PART 11  |  PART 12  |  PART 13  |  PART 14  |  PART 15
PART 16  |  PART 17  |  PART 18  |  PART 19  |  PART 20
PART 21  |  PART 22  

Anti Virus Hacker [ E-book Myanmar Version]

https://fbcdn-sphotos-d-a.akamaihd.net/hphotos-ak-prn2/t1.0-9/10305334_293226630832361_287163621311873246_n.jpg 


ဒီစာအုပ္ေလးက Computer အသုံးျပဳ ့သူတုိင္း ဖတ္ေစခ်င္ပါတယ္။
Internet user ေတြဆုိ ပုိလုိ ့ေတာင္ ဖတ္သင့္တယ္လုိ ့ကြ်န္ေတာ္ ယူဆထားပါတယ္။
ဘာလုိ ့လဲဆုိေတာ့အမ်ားစု က Anti Viurs Software ထည့္ထားရင္ သူတုိ ့ Computer ေတြ
လုံျခဳံ လွျပီ ထင္ေနၾကတာပါ။ ဒီေတာ့ ကြ်န္ေတာ္စိတ္ကူးေပါက္တာနဲ ့ဒီစာအုပ္ေလးနဲ ့ဘဲ စာဖတ္သူ
ညီကုိ ေမာင္ႏွမမ်ားကုိ မွ်ေ၀ေပးလုိက္ပါတယ္။ အတည္းမွာပါတဲ့အခ်က္ေတြကေတာ့
Anti Virus ရွိတာနဲ ့တင္ သင့္စက္က လုံျခဳံမူ မရွိနုိင္တဲ့အေၾကာင္းအရာေတြရယ္
ျပီးေတာ့ Anti Virus မမိေအာင္ Virus ေတြကို လုပ္ျခင္း နည္းပညာတစ္ခ်ဳဳိ  ့ရယ္ကုိ ထည့္သြင္းေရးသားေပးထားပါတယ္။ အေျခခံနဲ ့ ဗပာုသုတ ကုိရည္ရြယ္ျပီးေရးသားေပးထားတာျဖစ္လုိ ့ သင့္အတြက္ အေထာက္အကူမ်ားစြာျပဳ  ့လုိက္မယ္လုိ ့
ကြ်န္ေတာ္ ယူဆပါတယ္။ နားမလည္ဘူးထင္ရင္ ၃ ေခါက္ေလာက္ျပန္ဖတ္ပါစမ္းပါ။
ကြ်န္ေတာ္ကေတာ့ အားလုံးလုိုလို ကုိဖတ္ေစခ်င္ပါတယ္ သိျပီးသူမ်ားအေနနဲ ့လည္း ေ၀ဖန္ မူၾကိဳက္သလုိ ေပးနုိင္ပါတယ္။ Download ရယူလုိသူမ်ားကေတာ့ ေအာက္က မိမိ ၾကိဳက္ႏွစ္သက္ရာ
Link ကုိ click နုိပ္ျပီး Download ရယူလုိက္ပါ။
 
Download :  Ziddu : Dropbox : Zippyshare : Solidfile : Rghost 
  
                          Ge.TT :   GameFront : Crocko : ShareBeast : Tusfile

Wednesday, February 12, 2014

Window 7 မွာ Hard Disk ကို Partition ခြဲနည္း / ျပန္ေပါင္းနည္း


မဂၤလာပါ ... သူငယ္ခ်င္းတစ္ေယာက္ေမးထားတာေလးကို မသိေသးသူအားလံုးအတြက္ မွ်ေဝလိုက္ပါတယ္... သူေမးထားတာကေတာ့ Window 7 မွာ Partition ကို ဘယ္လို ခြဲရမလဲ ..? ျပီးေတာ့ ဘယ္လိုျပန္ေပါင္းရမလဲ ..? ဆိုျပီးေမးထားေလးပါ....

ဘယ္ Software မွ သံုးစရာမလိုပါဘူး Window ေပၚမွာပဲ ခြဲ/ေပါင္း လို႔ရပါတယ္......။
Partition ခြဲနည္း
Start >> Computer ကို Right Click နဲ႔ Manage ကို ႏွိပ္ပါ (သို႔) Run > diskmgmt.msc  ကို ေရးထည့္ျပီး Enter ေခါက္လည္းရပါတယ္...။

က်န္တာေတြကို ပံုေလးေတြအတိုင္း ဆက္လုပ္ေပးသြားပါ..။


Drive (C:) ကေနဥပမာ အျဖစ္ ခြဲျပပါ့မယ္... အေပၚကပံုမွာျပထားတဲ႔အတိုင္း (C:) ေပၚကို Right Click ႏွိပ္ျပီး Shrink Volume ကိုေရြးပါ..။

ခဏေစာင့္ေပးပါ..။

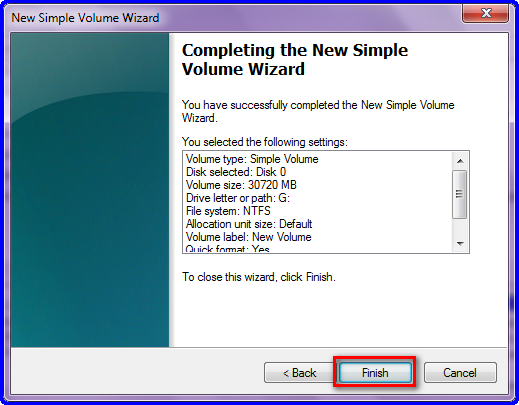
ဒီေနရာမွာ မိမိ လိုခ်င္သေလာက္ ခြဲပါမယ္... 1GB ကို 1024 MB ရွိပါတယ္ ..(မိမိ လိုသေလာက္ တြက္ခ်က္ျပီး ေရးထည့္ေပးလိုက္ပါ)  က်ေနာ္ကေတာ့ 30GB ခြဲမွာမို႔ 30720 လို႔ေရးထည့္ေပးလိုက္ပါတယ္...။ ျပီးရင္ Shrink  ကိုဆက္ႏွိပ္လိုက္ပါ..။


ခုဆိုရင္ နာမည္မေပးရေသးတဲ႔ Partition ေလးတစ္ခုေရာက္လာပါျပီ... မျပီးေသးပါဘူး သူ႕ကို နာမည္ေပး ကင္ပြန္းတပ္ဖို႔ က်န္ပါေသးတယ္ ... နာမည္ေပးဖို႔  Right Click  ေထာက္ျပီး   New Simple Voulem  ကိုေရြးေပးပါ..။


Next အဆင့္ဆင့္ ႏွိပ္ေပးျပီး ...


နာမည္တစ္ခုေရြးေပးလိုက္ပါ .. က်ေနာ္ကေတာ့ G ကိုေရြးေပးလိုက္ပါတယ္...။


Next အဆင့္ဆင့္ ႏွိပ္ေပးျပီး Finsh ကိုႏွိပ္ပါ..။


 My Computer ကိုဖြင့္ၾကည့္လိုက္ပါ ေမာင္ G ေလးအျဖစ္နဲ႔ Patition ေလးတစ္ခု ေရာက္လာပါျပီ...။
Partition ခြဲနည္းကေတာ့ အဲ့ဒါပါပဲ ....။

Partiton ျပန္ေပါင္းနည္း
မလိုခ်င္ေတာ့လို႔ ျပန္ေပါင္းခ်င္ရင္ေတာ့... ေမာင္ G ကို အရင္ဆံုး သတ္ပစ္ရပါလိမ့္မယ္ :D  
Delete လုပ္ေပးရပါ့မယ္..။


ေမာင္ G ေပၚကို Right Click  နဲ႔  Delete Volume ကိုေရြးပါ..


Yes ကိုႏွိပ္ပါ...


ျပန္ေပါင္းဖို႔ အတြက္ (C)  (သို႔) မိမိ ျပန္ေပါင္းေစလိုတဲ႔ (က်ေနာ္ကေတာ့ (C) ထဲကို ျပန္ေပါင္းမွာမို႔ (C) ေပၚကို Right Click ႏွိပ္လိုက္တာပါ) (D) (E) တစ္ခုခုေပၚကို Right Click ႏွိပ္ျပီး Extend Volume ကိုေရြးပါ ....


Next အဆင့္ဆင့္နဲ႔ OK လိုက္ပါ..။


ခုဆိုရင္ ေမာင္ G ေလးမရွိေတာ့ပဲ (C) ထဲကို ျပန္ေရာက္သြားပါျပီ....။

အဲ့ဒါကေတာ့ အားလံုး နားလည္လြယ္ေအာင္မို႔ အခ်ိန္ေပးျပီး ပံုေလးေတြနဲ႔ တင္ေပးလိုက္တာပါ ..

အလြယ္ကူဆံုး ခြဲထားတဲ႔ Partition ေတြကို ျပန္ေပါင္းခ်င္ရင္ေတာ့  Run > diskmgmt.msc  ကေနတဆင့္ကိုယ္ခြဲထားတဲ႔ (သို႔) ျပန္ေပါင္းေစခ်င္တဲ႔ (G) (H) (J) (Z) Partition ေပၚကို Right Click နဲ႔ Delete Volume ကိုေရြးျပီး Next အဆင့္ဆင့္နဲ႔ အရင္ဆံုး Delete လုပ္ပစ္လိုက္ပါ .... ျပီးမွ ကိုယ္ျပန္ေပါင္းေစခ်င္တဲ႔ (C) (D) (E) တစ္ခုခု ေပၚကို Right Click နဲ႔  Extend Volume ကိုေရြးျပီး Next အဆင့္ဆင့္ နဲ႔ OK ေပးလိုက္ပါ ဒါဆိုရင္ ခြဲထားတဲ႔ Partition ေပ်ာက္သြားျပီး မိမိ ျပန္ေပါင္းေစခ်င္တဲ႔ ေနရာကို ျပန္ေရာက္သြားပါျပီ...။
အားလံုး အဆင္ေျပၾကပါေစ...

ခုလိုအားေပးတဲ့အတြက္ အထူးေက်းဇဴးတင္ပါေၾကာင္း ေျပာၾကားပါရေစ..ဘေလာ့ခရီးသည္မွ နည္းပညာမ်ားအား မည္သူမဆို လြတ္လပ္စြာ ကူးယူသုံးစြဲနိဳင္ပါတယ္.. ကြ်န္ေတာ္ ပိုင္ဆိုင္ေသာေနရာေလးမ်ားအား ဆက္လက္ လည္ပါတ္လိုပါက ***************************************

Saturday, December 7, 2013

Mac Theme For Windows 7, Windows 8 And Windows XP


Mac Theme For Windows 7


Window မွာ Mac ဒီဇိုင္းသံုးခ်င္တဲ့သူေတြအတြက္ Window for Mac Theme ေလးပါ။မိမိတိုစက္နဲ႔ ကိုက္ညီတဲ့ ေဆာ့၀ဲကိုေဒါင္းၿပီး Install ၿပဳလုပ္ၿပီးေၿပာင္းလဲႏိုင္ပါတယ္။


Mac Theme For Windows 7 -

Mac Theme For Windows 8 -

Mac Theme For Windows XP -

Saturday, November 16, 2013

DriverEasy Professional v4.6.2.32670 + Keygen

PC ဒါမွမဟုတ္ Laptop အတြက္ Driver ျပသာနာရွိသူမ်ား နဲ႕ Driver လိုအပ္ေနသူမ်ားအတြက္ DriverEasy Professional ေနာက္ဆံုးထြက္ Version ေလးကိုတင္ေပးလိုက္ပါတယ္ဗ်ာ။ ဒီေကာင္ေလးက အသံုးျပဳရလြယ္ ကူတဲ႕အတြက္ လူသံုးမ်ားပါတယ္။ Computer နဲ႕ Hardware Device ေတြမွာ Detect မသိခဲ႕ဘူး Driver မရွိဘူး ဆိုရင္ DriverEasy Professional ကေဆာင္ရြက္ေပးပါလိမ့္မယ္။ မိမိမွာရွိထားျပီးေသာ Driver မ်ားကို Back/Restore ျပဳလုပ္ႏိုင္ျခင္း ၊ မလိုအပ္ေသာ Driver မ်ားကို Uninstall ျပဳလုပ္ေပးႏိုင္ျခင္း ၊ Window အား Update ျပဳလုပ္ေပးႏိုင္ျခင္း ၊ ရွိထားျပီးေသာ Driver မ်ားကို Update ျပဳလုပ္ႏိုင္ျခင္း စတာေတြအျပင္ အျခား လုပ္ေဆာင္ခ်က္မ်ားစြာကိုလည္းျပဳလုပ္ေပးႏိုင္ပါတယ္။ အျမဲ တမ္းသံုးႏိုင္ေအာင္ Full Version အျဖစ္ Keygen ကိုထည့္ေပးထားပါတယ္ဗ်ာ။
ေဒါင္းရန္ ... ဒီမွာ နဲ ့ ဒီမွာ 

Monday, October 14, 2013

Driver ေပါင္း တစ္သိန္း စုစည္းတင္ျပျခင္း

http://203.172.169.195/driver/100,000%20DRIVER+%E0%B8%9B%E0%B8%81/Picture%20003.jpg
Driver ေပါင္း တစ္သိန္းဆိုကတည္းကိုက Service သမားေတြေရာ User ေတြပါစိတ္၀င္စားၾကမယ္လို႕ထင္ပါ တယ္ဗ်ာ ။ တကယ္လည္းစိတ္၀င္စားစရာေကာင္းပါတယ္။ ဘာေၾကာင့္လည္းဆိုရင္ေတာ့ ကြန္ျပဴတာမွာ အေရးၾကီးဆံုးဟာ Driver ပါဘဲ။ Driver မရွိဘူးဆိုရင္ေတာ့ အဲဒီကြန္ျပဴတာဟာ အလုပ္ျဖစ္မွာမဟုတ္ပါဘူး။ ဒါေၾကာင့္ အားလံုးအတြက္အသံုးတည့္ေစမယ့္ Driver ေပါင္းတစ္သိန္းစုစည္းထားတာေလးကို ေဘာ္ဒါၾကီး ဦးဦးေကာင္းခန္႕ ဆီကေန ယူလာတာပါဗ်ာ။


**  Step-1.ေအာက္က Download Button ကိုႏွိပ္လိုက္ပါ  
**  Step-2. "5sec". ေလာက္ေစာင္႕ေပးပါ။

**  Step-3. "  << SKIP AD >>   ".ကိုႏွိပ္ေပးပါ။
**  Step-4. Download Link က်လာပါလိမ္႕မယ္။
**  အဆင္ေျပပါေစဗ်ာ။

Monday, October 7, 2013

Windows အားလုံးအတြက္ product keys မ်ား

Windows 8 ကို Upgrade လုပ္လိုက္တဲ့သူေတြအတြက္ Activator မသံုးခင္ ေတာင္းတဲ့ ကီးကို ျဖည့္ေပးဖို႔ ကၽြန္ေတာ္ ရွာေဖြ တင္ေပးလိုက္ပါတယ္.. ဒီထဲမွာ ထြက္ခဲ့သမ် Windows 8 ကီးေတြ အားလံုးနီးပါး ပါဝင္တယ္လို႔ သိရပါတယ္.. Activate လုပ္တဲ့အခါေတာ့ Offline နဲ႔သြင္းေပးရမွာျဖစ္ပါတယ္.. Online ခ်ိတ္ထားရင္ေတာ့ Block လုပ္ခံရမွာပါ.. ကီးနဲ႔ အဆင္ေျပသြားရင္ေတာ့ Activator ေလးနဲ႔ ေနာက္ဆံုး Activate လုပ္ဖို႔ အႀကံေပးခ်င္ပါတယ္.. ၿပီးေတာ့ Windows Update ကို Disable လုပ္ထားဖို႔ အေရးႀကီးပါတယ္.. ဘာေၾကာင့္လဲ ဆိုေတာ့ ကၽြန္ေတာ္တို႔ေတြက လိုင္စင္နဲ႔ဝယ္သံုးတာ မဟုတ္တဲ့အတြက္ Pirate Version ေတြကို Update လုပ္မိရင္ Windows is not Genuine ဆိုၿပီး အမဲေရာင္ Background ျဖစ္သြားပါလိမ့္မယ္..
Windows 8 Product Key

*****************

MAK (Multiple Activation Key NEW

3HBY3-3GNXP-22R96-CCMCB-HT67C

OR

KGQND-Q2HH6-XHXHC-89VWW-82KVC

*****

Professional Procuct Key

XKY4K-2NRWR-8F6P2-448RF-CRYQH

TK8TP-9JN6P-7X7WW-RFFTV-B7QPF

9G4HW-VH26C-733KW-K6F68-J8CK4

*****

Enterprise Product Key

27NW-9KQ84-P47T8-D8GGY-CWCK7

XKY4K-29RWR-8F6P2-448RF-CRYQH

new update 06-12-2012

Windows RTM

Professional,ProfessionalN,Enterprise,EnterpriseN

Volume MAK

3HBY3-3GNXP-22R96-CCMCB-HT67C

KGQND-Q2HH6-XHXHC-89VWW-82KVC

6CNK2-RTVRV-TXYQK-86DBM-B4DHC

F2V7V-8WN76-77BPV-MKY36-MKH3P

Windows 8 RTM Core Retail

F2V7V-8WN76-77BPV-MKY36-MKH3P

3MHNP-V3YQ3-6XJYK-9P93C-749T3

48H7B-NXQ2P-YKBY6-BP74B-QJXT3

7RN69-T7DTK-WD2GF-R3MJQ-RJMQD

8N4QH-2WT9H-T7GRF-3JBKY-DPBQD

See More >> http://adf.ly/QGA1u
@ Fwd Mail

Window 7 Power Button မ်ားအေၾကာင္း

ကၽြန္ေတာ္တုိ႕ Window 7 မွာ ပါတဲ႕ Power Button ေတြကုိ လြယ္မေရာင္နဲ႕ ခက္ တိမ္မေရာင္နဲ႕ နက္ဆုိသလုိေပါ႔ ဒါေတြကို ေန႕တိုင္းေတာ႕ သုံးေနက်တာဘဲ ။ ဒါေပမဲ႕ ကြဲကြဲ ျပားျပား သိတဲ႕ လူရွိေပမဲ႕ အေျခခံသမားေတြ ေတာ္ေတာ္မ်ားမ်ား သိတာ အေတာ္ရွားတယ္။ ဒါေၾကာင္႔ ဒီ Button ေတြကုိ နားလည္းေစေခ်င္တဲ႕ စိတ္ဆႏၵကုိ အရင္းခံျပီး တင္ျပလုိက္တာပါ။ သိတဲ႕ လူေတြကုိေတာ႕ မေျပာလုိပါဘူး။ မသိတဲ႕ မိတ္ေဆြမ်ားကို ရည္ညႊန္း တင္ျပေပးတာ ျဖစ္ပါတယ္။
Screensaver and Sl**p
Screensaver နဲ႔ Sl**p တို႔က အလုပ္လုပ္ပံုခ်င္း တူၾကသလို လုပ္ေဆာင္ပံုခ်င္းလည္း မကြာၾကပါဘူး။ က်ေတာ္တို႔ Window Xp မွာဆိုရင္ေတာ့ Screensaver လို႔ေခၚပီး Window 7 မွာေတာ့ Turn of Display ဆိုပီး ေတြ႔ရပါလိမ့္မယ္။ သူရဲ႕ လုပ္ေဆာင္ပံုကေတာ့ အားလံုးသိပီးတဲ႔အတိုင္း စက္ကိုမပိတ္ပဲ ဒီတိုင္းထားတာ ၾကာလာတဲ႔အခါ Power Save လုပ္တဲ႔အေနနဲ႔ Monitor ကို ခနပိတ္ေပးထားရံုပါပဲ။ လုပ္လက္စ အလုပ္ေတြကလည္း ဆက္ပီးလုပ္ေနဦးမွာပဲ ျဖစ္ပါတယ္။
Sl**p ရဲ႕ အလုပ္လုပ္ပံုက က်ေတာ္တို႔ လုပ္လက္စ အလုပ္ေတြကို ခဏရပ္ပီး ထမင္းစားတာၿဖစ္ၿဖစ္ စက္နဲ႔ေ၀းတဲ႔ေနရာကို ခနသြားပီး ျပန္လာတာနဲ႔ လုပ္လက္စေတြကို ခ်က္ခ်င္းျပန္လုပ္ခ်င္ တဲ႔အေျခအေန မ်ိဴးဆိုရင္ Sl**p က Ram ထဲမွာ လုပ္လက္စေတြကို သိမ္းထားေပးပါတယ္။ တနည္းအားၿဖင့္ Stand by သေဘာပါပဲ။ Laptop ေတြမွာဆိုရင္ Sl**p လုပ္ထားခဲ႔ရင္ သူက Power(Battery) သံုးစြဲမွူကို အနည္းငယ္ ေလ်ာ့ခ်ေပးတဲ႔ အတြက္ Plug in မလုပ္ဘဲ Laptop ကိုသံုးေနရတဲ႔ အခါမ်ိဴးမွာ အဆင္ေၿပေစပါတယ္။ ဘာေၾကာင့္ အနည္းငယ္ပဲ လို႔ဆိုရတာလဲ ဆိုေတာ့ Sl**p က Power Supply ကို Shut Down လုပ္လိုက္တာ မဟုတ္တဲ႔အၿပင္ Ram ထဲမွာ လုပ္လက္စေတြကို ဆက္မွတ္ထားဖို႔ Power အနည္းငယ္ လိုအပ္တဲ႔ အတြက္ေၾကာင့္ပါ။ Sl**p ရဲ႕ အားနည္းခ်က္ေတြ ကေတာ့ က်ေတာ္တို႔ Sl**p လုပ္ထားပီး မီးပ်က္သြားပဲ ျဖစ္ျဖစ္၊ Laptop ေတြမွာဆိုရင္ Sl**p လုပ္ထားတုန္း Battery ကုန္သြားတာမ်ိဴးဆိုရင္ လုပ္လက္စအလုပ္ေတြ၊ ဖြင့္ထားတဲ႔ ဖိုင္ေတြအကုန္ ပိတ္လိုက္တဲ႔ အတြက္ မိမိလုပ္ထားေတြ Save မလုပ္ထားတဲ႔ အရာေတြအကုန္ ပ်က္သြားပါတယ္။ ( Power Option ကေန Monitor , Hard Disk ေတြကုိလည္ Turn on.Turn off သတ္မွတ္ႏုိင္ပါေသးတယ္။
Hibernation & Shutdown
Shutdown နဲ႔ Hibernation က အလုပ္လုပ္တဲ႔ ပံုစံခ်င္းတူညီ ၾကေပမယ့္ လုပ္ေဆာင္မွူခ်င္းက်ေတာ့ နည္းနည္းေလးကြာပါတယ္။ ဆိုလိုတာက Hibernation နဲ႔ Shutdown တခုခု လုပ္လိုက္တာနဲ႔ စက္ၾကီးပိတ္ၿပီ Power Off သြားတာခ်င္း တူေပမယ့္ ျဖစ္သြားတဲ႔ အျဖစ္အပ်က္ေတြ နည္းနည္းေလး ကြာပါတယ္။ Shutdown လုပ္လိုက္ရင္ လုပ္လက္စေတြထဲက တခ်ိဴ႕ application ေတြကို စက္က အလိုလိုပိတ္ေပးပီး တခ်ိဴ႕ေတြကို ေတာ့ Save လုပ္မွာလား မလုပ္ဘူးလား Force Shut down လုပ္မွာ လားဆိုပီး ေမးပါတယ္။ Force Shut Down ဆိုရင္ေတာ့ လုပ္လက္စေတြကို Save မလုပ္ေပးေတာ့ပါဘူး။
Hibernation အပိုင္းမွာေတာ့ Hibernation လုပ္လိုက္တာနဲ႔ သူကလုပ္လက္စ အလုပ္ေတြအကုန္လံုးကို Hard Disk ထဲမွာ Hiberfil.sys File တခုတည္ေဆာက္ကာ လုပ္လက္စေတြကို ခ်က္ခ်င္းမွတ္ထားပီး Power ကိုပိတ္လိုက္ပါတယ္။ မိမိစက္ကို ျပန္ဖြင့္တဲ႔အခါ ျမန္ျမန္ဆန္ဆန္ မိမိလုပ္လက္စ ေနရာကို ေနာက္ဆံုး အေျခအေနအတိုင္း မပ်က္မစီးဘဲ ျပန္လည္ေရာက္ရွိ ရရွိေစပါတယ္။
Vista မွာဆိုရင္ Hibernation ကို Hybrid sl**p mode လို႔ေခၚပါတယ္။ က်ေတာ္တို႔ Window Vista မွာဆိုရင္ Sl**p လုပ္တာနဲ႔ Hybrid Sl**p Mode အေျခအေနကို တခါတည္း ကူးေၿပာင္းသြား ေစတဲ႔အတြက္ Data ေတြ ဆံုးရံူးမွာ ေၾကာက္စရာမလိုပါဘူး။ တကယ္လို႔ Hybrid Sl**p ကို Disable ဒါမွမဟုတ္ Turn off ေပးထားခဲ႔ရင္ Sl**p Mode သေဘာအတိုင္းပဲ အလုပ္လုပ္မွာ ျဖစ္တဲ႔အတြက္ ရုတ္တရက္ Power off ျဖစ္ခဲ႔ရင္ လုပ္လက္စ Data ေတြျပန္ရမွာ မဟုတ္ေတာ့ပါဘူး။ သူရဲ႕ အားသာခ်က္ကေတာ့ လုပ္လက္စေတြကို Standby အေနနဲ႔ ခနရပ္ထားပီး ခ်က္ခ်င္းပဲ ေနာက္ဆံုးအေနအထားကို ျပန္လိုခ်င္တဲ႔ Power ေခ်ြတာပီး သံုးစြဲေနရတဲ႔ Laptop သမားေတြအတြက္ ပိုမိုအဆင္ေၿပေစပါတယ္။ ဒါေပမယ့္ သူ႔ရဲ႕အားနည္းခ်က္ကေတာ့ Memory ထဲမွာ Hiberifil.sys ဆိုတဲ႔ Hibernation File ေတြကို မွတ္ထားေပးတဲ႔ အတြက္ Disk Space ထဲမွာ Fragmentation File ေတြ ၿဖစ္ေပၚလာေစတဲ႔ အတြက္ Disk ကို Defeagement ျပန္လုပ္ေပးဖို႔ေတာ့ မေမ့သင့္ပါဘူး။ ဒါေၾကာင့္ မိမိလုပ္ခ်င္တဲ႔ အေျခအေနကို မိမိေသခ်ာေရြးခ်ယ္ လုပ္ေဆာင္လို႔ေအာင္ ဗဟုသုတအျဖစ္ ေ၀မွ်လိုက္ပါတယ္။
Switch User & Lock
သူတို႔ရဲ႕ လုပ္ေဆာင္ခ်က္ေတြကေတာ့ မကြာၾကပါဘူး။ မိမိလုပ္လက္စ အလုပ္ေတြကို မိမိစက္နားမွာ မရွိတဲ႔အခ်ိန္မွာ သူမ်ားေတြ မသိေစခ်င္ရင္ Adminstrator မွာ Password ခံထားရင္ အလုပ္ၿဖစ္တဲ႔ ေကာင္ေလးေတြပါ။
Switch User ပဲျဖစ္ျဖစ္ Lock ပဲျဖစ္ျဖစ္ လုပ္ထားပီး မိမိျပန္သံုးခ်င္တဲ႔အခါ Password ခံထားရင္ Password ေလးရိုက္ပီး Login ၿပန္၀င္လုပ္လိုက္ ရံုပါဘဲ။ လုပ္လက္စေတြ ဘာမွမပိတ္ မပ်က္စီးပါဘူး။ (မီးမပ်က္ခဲ႔ရင္ေပါ့ …P)
Logoff & Restart
Logoff ရဲ႕ လုပ္ေဆာင္ခ်က္ကေတာ့ သူက ကၽြန္ေတာ္တုိ႕ Application တစ္ခု Run ျပီးလုိ႕ Restart ခ်ခုိင္းတဲ႕ ေနရာမွာ Restart ခ် စရာမလုိဘဲ Logoff လုပ္ေပးတာနဲ႕ အခ်ိန္တုိအတြင္ အဲ႕ဒီ Application အလုပ္လုပ္မွာျဖစ္ပါတယ္။ လုပ္လက္စေတြ အကုန္လံုးကို Save မလုပ္ဘဲ အကုန္ပိတ္ပစ္လိုက္ပါတယ္။ ဒါေပမယ့္ Power Supply ေတာ့ပိတ္မသြားပါဘူး။ သူက Login လုပ္တဲ႔ အပိုင္းေနာက္က အလုပ္ေတြအကုန္ Log Off ထြက္လိုက္တဲ႔ သေဘာပါပဲ။ (သူ႕ကိုဘယ္ေနရာမွာ အသံုးခ်မလဲဆိုေတာ့ က်ေတာ္တို႕ Registry ပိုင္းမွာ တခုခု၀င့္ျပင္တာမ်ိဴး၊ ဒါမွမဟုတ္ Software တခုခု ရမ္းပီးတဲ႔အခါ Restar ေပးဖို႔ လိုအပ္လာရင္ Restat မေပးဘဲ Logoff လုပ္ရံုနဲ႔လည္း မိမိလုပ္ခ်င္တဲ႔ အလုပ္ေတြ Activate(ၿပီးေျမာက္) ေစပါတယ္။)
ဖတ္ရတာေလး ျပန္လည္မွ်ေ၀ျခင္းပါဗ်ာ....
အိမ့္(သိုးမဲေလး)

Windows 7 toolsမ်ား

Windows 7 မွာပါတဲ႔ ထူးကဲတဲ႔ shortcut ways ေလးေတြပါ။ သိၿပီးသား သူမ်ားအတြက္ ကၽြန္ေတာ္မရည္ရြယ္ပါဘူး။ မသိေသးတဲ႔ သူငယ္ခ်င္းမ်ား၊ လိုအပ္မယ္ထင္တဲ႔ သူငယ္ခ်င္းမ်ား လိုသလို အသံုးျပဴႏိုင္ေအာင္သာ ေ၀မွ်လိုက္ျခင္း ျဖစ္ပါတယ္။ ေလ့လာၾကည့္လိုက္ ၾကပါဦး။
1. Drag to Desktop
တစ္ခါတစ္ေလ အင္တာနက္မွာ သြားရင္းလာရင္း ပံုလွလွေတြ တစ္ပံုတစ္ေအာၾကီး ေတြ႔တဲ႔အခါ မိမိစက္ထဲမွာ သိမ္းထားခ်င္တတ္ၾကပါတယ္။ အဲဒီအခါ တစ္ပံုခ်င္းကို Right Click နဲ႔ တစ္ပံုခ်င္းသိမ္းတဲ႔အခါ ပံုနည္းရင္ေတာ့ ျပႆနာမရွိဘူးေပါ့။ ပံုမ်ားလာရင္ စိတ္ညစ္မွာေပါ႔။ ဒီလိုအခါမ်ိဴးမွာဆို ျမန္ျမန္သိမ္းလို႔ရေအာင္ ပံုေလးကို Click ေလးေထာက္ျပီး Desktop ေပၚဆြဲတင္လိုက္တာနဲ႔ Desktop မွာ Safe ၿပီးသား ျဖစ္သြားမွာပါ။ ကဲ ဘယ္ေလာက္ျမန္လဲ။
2. Extend Option in Send to
ေနာက္တစ္ခုက Extend Option ကိုခ်ဲ႕ထြင္တဲ႔ နည္းလမ္းေလးပါ။ မိမိတို႔ သိမ္းခ်င္တဲ႔ အရာတစ္ခုကို တစ္ေနရာကေန တစ္ေနရာကို ေရြ႔ထားခ်င္တဲ႔အခါ Send to ေလးနဲ႔တစ္ခါတည္း ေရြ႕လို႔ရပါတယ္။ မိမိေရြ႔႕ေျပာင္းခ်င္တဲ႔ တစ္ခုခုေပၚ Shift ေလးေထာက္ျပီး Right Click ကေန Send to ကို ၾကည့္လိုက္ရင္ သြားလို႔ရတဲ႔ ေနရာေတြ အမ်ားႀကီးထြက္လာတာကို ေတြ႔ရမွာျဖစ္ပါတယ္။
3. Run as Administrator
Cmd ကိုဖြင့္တဲ႔အခါ Run as administrator နဲ႔ ဖြင့္လိုတဲ႔အခါ Cmd ေလးကိုေထာက္ျပီး Ctrl+Shift ေပါင္းႏွိပ္ျပီး Click လုပ္ျ္ပီး Run လိုက္ရင္ Run as administrator အေနနဲ႔ တစ္ခါတည္း ပြင့္သြားပါတယ္။
4. Quick Search
Folder ေတြထဲမွာ သိမ္းထားတာေတြကို ျမန္ျမန္ဆန္ဆန္နဲ႔ လြယ္လြယ္ကူကူ ရွာခ်င္ရင္ေတာ့ မိမိရွာခ်င္တဲ႔ Folder ကိုဖြင့္ျပီး ညာဘက္အေပၚေထာင့္ေလးက Search Box ေလးမွာ (*) ေလးကို အသံုးျပဴပီး ရွာလို႔ရပါတယ္။ ရွာနည္းကေတာ့ avi ကိုရွာခ်င္ရင္ *.avi, pdf ကိုရွာခ်င္ရင္ *.pdf ဆိုျပီး ရွာလို႔ရပါတယ္။ ေနာက္တစ္ခုက Size အေနနဲ႔လည္း ရွာလို႕ရပါတယ္။ ရွာနည္းကေတာ့ Size: လို႔ရိုက္လိုက္တာနဲ႔ ဘယ္ေလာက္ဆိုဒ္ကေန ဘယ္ေလာက္အတြင္း ရွာခ်င္သလဲဆိုတာ အလိုေလ်ာက္ တစ္ခါတည္းေပၚ လာေပးမွာျဖစ္ပါတယ္။ (Search Code ေတြလည္း အမ်ားႀကီး ရွိပါေသးတယ္)။
5. Drag To Mail
ဒါေလးကေတာ့ မိမိေမးပို႔စဥ္ Attach လုပ္မယ့္အရာကို ျမန္ျမန္ဆန္ဆန္ ျဖစ္ေအာင္ဆြဲထည့္ ႏိုင္တဲ႔ နည္းလမ္းေလးပါပဲ။ ပို႔ခ်င္တဲ႔ အရာတစ္ခုကို ပိုမယ့္လိပ္စာျဖစ္တဲ႔ To ဆိုတဲ႔နားေလးေရာက္ေအာင္ Drag ဆြဲထည့္လိုက္တာနဲ႔ Attach လုပ္ပီးသား ျဖစ္သြားပါပီ။
Windows ကို ကၽြမ္းက်င္စြာ အသံုးျပဴတတ္ဖုိ႔ တတ္ႏိုင္သမ်ွ စုစည္းေဖာ္ျပေပး လိုက္တာပါ။ အားလံုး အဆင္ေျပၾကပါေစ။
ဖတ္ရတာေလး ျပန္လည္မွ်ေ၀ေပးျခင္းပါ.....
အိမ့္(သိုးမဲေလး)

Sunday, September 29, 2013

RunBoxအတြက္commandမ်ား


Run box မွာ ႐ိုက္ရွာလို႔ ရတဲ႔ command ေလးေတြပါ ။ကၽြန္ေတာ္ ရွာလို႔ ရသေလာက္
တင္ေပးလိုက္တာျဖစ္ပါတယ္။ေလ႔လာၾကည္႕ၾကပါ။
တကယ္ေတာ့ ကၽြန္ေတာ္ကိုယ္တိုင္လည္း ၁၀ခုေလာက္ေတာင္အလြတ္ မရပါဘူး။
ဘာမွလည္းမတက္ပါဘူး တက္ျခင္ေယာက္ေဆာင္ပီးေတာ့ ေရွာက္ဖီးေနတာပါ။
ေအာက္နားကRun Command ေတြကဖီးတာမဟုတ္ဘူးေနာ္ ေတာ္ၾကာအဲ့ဒါပါဖီးတယ္ထင္ပီးေတာ့ မေလ့လာေတာ့ပဲပိတ္ပစ္ေနဦးမယ္။
အမ်ားႀကီးရွိတာေနာ္ ဆက္လက္ဖတ္႐ႈ႕ရန္ဆိုတာကို ႏွိက္ဖို႕ေတာ့မေမ့ၾကပါနဲ႕ေနာ္
Application = Command
Accessibility Controls = access.cpl
Add Hardware Wizard = hdwwiz.cpl
Add/Remove Programs = appwiz.cpl
Administrative Tools = control admintools
Automatic Updates = wuaucpl.cpl
Bluetooth Transfer Wizard = fsquirt
Calculator = calc
Certificate Manager = certmgr.msc
Character Map = charmap
Check Disk Utility = chkdsk
Clipboard Viewer = clipbrd
Command Prompt = cmd
Component Services = dcomcnfg
Computer Management = compmgmt.msc
Date and Time Properties = timedate.cpl
DDE Shares = ddeshare
Device Manager = devmgmt.msc
Direct X Control Panel (If Installed)* = directx.cpl
Direct X Troubleshooter = dxdiag
Disk Cleanup Utility = cleanmgr
Disk Defragment = dfrg.msc
Disk Management = diskmgmt.msc
Disk Partition Manager = diskpart
Display Properties = control desktop/desk.cpl
Dr. Watson System Troubleshooting Utility = drwtsn32
Driver Verifier Utility = verifier
Event Viewer = eventvwr.msc
File Signature Verification Tool = sigverif
Findfast = findfast.cpl
Folders Properties = control folders
Fonts = control fonts
Fonts Folder = fonts
Free Cell Card Game = freecell
Game Controllers = joy.cpl
Group Policy Editor (XP Prof) = gpedit.msc
Hearts Card Game = mshearts
Iexpress Wizard = iexpress
Indexing Service = ciadv.msc
Internet Properties = inetcpl.cpl
IP Configuration = ipconfig
Java Control Panel (If Installed) = jpicpl32.cpl
Java Application Cache Viewer (If Installed) = javaws
Keyboard Properties = control keyboard
Local Security Settings = secpol.msc
Local Users and Groups = lusrmgr.msc
Logs You Out Of Windows = logoff
Microsoft Chat = winchat
Minesweeper Game = winmine
Mouse Properties = control mouse
Mouse Properties = main.cpl
Network Connections = control netconnections
Network Connections = ncpa.cpl
Network Setup Wizard = netsetup.cpl
Notepad = notepad
Nview Desktop Manager (If Installed) = nvtuicpl.cpl
Object Packager = packager
ODBC Data Source Administrator = odbccp32.cpl
On Screen Keyboard = osk
Opens AC3 Filter (If Installed) = ac3filter.cpl
Password Properties = password.cpl
Performance Monitor = perfmon.msc
Performance Monitor = perfmon
Phone and Modem Options = telephon.cpl
Power Configuration = powercfg.cpl
Printers and Faxes = control printers
Printers Folder = printers
Private Character Editor = eudcedit
Quicktime (If Installed) = QuickTime.cpl
Regional Settings = intl.cpl
Registry Editor = regedit
Registry Editor = regedit32
Remote Desktop = mstsc
Removable Storage = ntmsmgr.msc
Removable Storage Operator Requests = ntmsoprq.msc
Resultant Set of Policy (XP Prof) = rsop.msc
Scanners and Cameras = sticpl.cpl
Scheduled Tasks = control schedtasks
Security Center = wscui.cpl
Services = services.msc
Shared Folders = fsmgmt.msc
Shuts Down Windows = shutdown
Sounds and Audio = mmsys.cpl
Spider Solitare Card Game = spider
SQL Client Configuration = cliconfg
System Configuration Editor = sysedit
System Configuration Utility = msconfig
System File Checker Utility = sfc
System Properties = sysdm.cpl
Task Manager = taskmgr
Telnet Client = telnet
User Account Management = nusrmgr.cpl
Utility Manager = utilman
Windows Firewall = firewall.cpl
Windows Magnifier = magnify
Windows Management Infrastructure = wmimgmt.msc
Windows System Security Tool = syskey
Windows Update Launches = wupdmgr
Windows XP Tour Wizard = tourstart
Wordpad = write
%allusersprofile% >> ကြန္ပ်ဳတာကို သံုးေနတဲ့သူ အားလံုးရဲ႕ Profile ေတြရွိေနတဲ့ ေနရာကို ျပေပးပါတယ္။
%appdata% >> အသံုးခ်ေဆာ့ဖ္၀ဲေတြရဲ႕ အခ်က္အလက္ေတြ သိမ္းထားတဲ့ ေနရာပါ။
%comspec% >> Command shell တကယ္ အလုပ္လုပ္ေနတဲ့ ေနရာ။
%homedrive% >> လက္ရွိသံုးေနတဲ့ သူရဲ႕ Home Drive ေနရာ။
%homepath% >> လက္ရွိသံုးေနတဲ့ သူရဲ႕ Home Drive လမ္းေၾကာင္း။
%logonserver% >> လက္ရွိ၀င္သုံးေနတဲ့သူရဲ႕ Domain Controller
%programfiles% >> ေဆာ့ဖ္၀ဲေတြ ထည့္သြင္းထားတဲ့ ေနရာ
%systemdrive% >> ၀င္းဒိုးရဲ႕ ပင္မ Directory
%systemroot% >> ၀င္းဒိုးရဲ႕ ပင္မ Root Directory
%tmp% သို႔မဟုတ္ %temp% >> လက္ရွိသံုးေနတဲ့ ေဆာ့ဖ္၀ဲေတြ အလုပ္လုပ္လက္စ ဖိုင္ေတြရွိရာေနရာ
%username% >> လက္ရွိသံုးေနတဲ့သူ အမည္
%userdomain% >> လက္ရွိသံုးေနတဲ့ Domain အမည္
%userprofile% >> လက္ရွိသံုးေနတဲ့သူရဲ႕ Profile ရွိရာေနရာ
%windir% >> OS တင္ထားတဲ့ ေနရာ
ေတာ္ေတာ္ေလးေတာ့မ်ားတယ္ေနာ္ NotePad ထဲကိုသာကူးၿပီးေတာ့သိမ္းထားလိုက္ေနာ္
ေလလြင့္သူေလး ကိုယ္တိုင္ေတာင္အကုန္မစမ္းရေသးဘူး ေနာ္ အဲ့ဒါေတြကိုသိထားရင္ တစ္ခုေျပာျပမယ္ေနာ္ ႐ႈးတိုးတုိးေလးေနာ္ ေဘးလူေတြမၾကားေစနဲ႕ေနာ္ တိတ္တိတ္ေလးနားေထာင္ ေျပာမယ္ အဲ့ဒါေတြကို အကုန္သိရင္ virus ေတြ ေရးလို႔ရတယ္ keylogger ေတြေရးလို႔ရတယ္ programing
lanuage  တစ္ခုခုနဲ႕သာတြဲသံုးလိုက္ေပါ့ ေရးနည္းကိုေတာ့လာမေမးနဲ႕ေနာ္ ေလလြင့္သူေလးကိုယ္တိုင္လည္းမေရးတက္ဘူး ေတာ္ၾကာလာေမးေနမွာဆိုးလို႔ အေကာင္းဘက္ကေနဆိုရင္ေတာ့ Program ေတြလည္းလုပ္လို႔ရပါတယ္ ဒါေတြကအေျခခံပါပဲ
ကဲကဲဇာတ္သိမ္းလိုက္ေတာ့မယ္ အဆင္ေျပၾကပါေစ